
[ad_1]
Apple’s range of MacBooks that use their own Silicon M1 or M2 processors can’t natively connect more than one external monitor, a severe limitation on the previous generation of Intel-based Mac laptops that could handle two displays when connected to USB-C. or a Thunderbolt 3 dock or hub.
M1 Pro and M1 Max support multiple external displays. We hoped that M2 would get rid of the M1 limitation, but it remained on the simple M2; when available, expect the M2 Pro and M2 Max to support more displays, just like their M1 siblings.
However, there are ways to get around this M1/M2 limitation by allowing you to run two external displays from the MacBook M1, which we will describe here. There is a software driver plus hardware adapter workaround, and a hub or adapter workaround.
There are some risks with the software workaround as you will need to install third party drivers which may not be supported in future macOS updates. And you’ll probably have to buy at least one adapter, where previously a docking station and display cable would have been enough for each external screen.
The hardware solution includes a dual HDMI adapter that requires a bit of tweaking in System Preferences when set up.
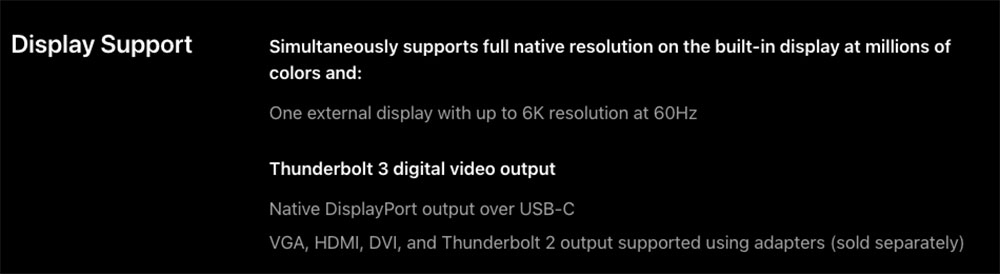
If you’ve been waiting for Apple’s latest 14-inch or 16-inch MacBook Pro M1 Pro M1 Max models, you’re in luck as these laptops support multiple external displays. Notebooks with the M1 Pro can connect to two external displays up to 6K at 60Hz, while MacBooks with the M1 Max can connect to up to three external displays up to 6K and one external display up to 4K at 60Hz.
M1/M2 owners, start saving for a new MacBook Pro or read on.
External displays: the big problem with the Mac M1 and M2
The Apple Mac mini, MacBook Air, and MacBook Pro 13in were the first Macs with the Apple-designed M1 processor. They have received rave reviews for speed improvements over Intel-based laptops, including here at Macworld.
Check out our 13″ MacBook Pro (M1) vs. MacBook Pro (Intel) and MacBook Air (M1 Silicon) vs. MacBook Air (Intel) comparison. We also looked at the differences between Mac mini (M1) and Mac mini (Intel).
But if your MacBook setup includes more than one external display, you have a serious problem. Apple’s M1 or M2 chips simply won’t take this into account – at least not initially.
Apple states in the M1 and M2 MacBook Air and MacBook Pro datasheets that they only support “one external display up to 6K resolution at 60Hz.”
Apple
While the MacBook M1 and M2 natively support only one monitor, the M1 Mac Mini natively supports up to two external monitors – one via HDMI and one via USB-C. But the M1 MacBook Air and MacBook Pro only support one external display.
Apple has apparently promised to fix the issue in a future macOS update, but the arrival of the later M1 Pro and M1 Max, and more recently the M2, suggests that M1 owners may have to wait a long time. We’ve got this guide to Mac M1 monitors and what you need to know before you buy.
Workaround #1: Install DisplayLink Software Drivers
Docking station maker Plugable suggests using a combination of display technologies to get around the MacBook M1/M2’s single-monitor limitation. This should work with most third-party docks, though many manufacturers don’t recommend it.
Plugable Multi-Display Docks use a combination of native USB-C Alternate Mode (native “Alternate Mode” video output) and DisplayLink technology. This combination serves as a workaround for the M1/M2 platform, which only supports one external display via USB-C.
Please note that DisplayLink requires a third party driver to be installed on Mac. There are different versions of the DisplayLink driver, and some bring their own compromises to the party.
And this solution still requires an additional hardware adapter.
The DisplayLink app for macOS or the DisplayLink Manager app are ways to enable DisplayLink technology on macOS. The app is available as a standalone installer and not through the Mac App Store.
one. Download the latest Mac DisplayLink driver first.
The DisplayLink Manager Graphics Connectivity App version 1.1.0 is compatible with macOS Catalina 10.15, macOS 11 Big Sur, and macOS 12 Monterey. It can be controlled using the DisplayLink icon in the Apple menu bar.
MacOS requires the user to enable “Screen Recording” in order for DisplayLink devices to work properly. This can be found in System Preferences under “Privacy” under “Security and Privacy”; Go to screen recording in the list on the left, then check the screen recording permission for DisplayLink Manager after unlocking the lock with the administrator password. You may have to close and restart DisplayLink Manager afterwards.
More information about DisplayLink Manager on macOS Big Sur, Catalina and Monterey can be found on this DisplayLink support page.
Installation is simple, but please note that this version does not support Closed Display/Clamshell Laptop Mode.
Other limitations include incompatibility with display rotation. Rotation on Apple M1/M2 requires DisplayLink Manager 1.6+ with macOS 12+.
The DisplayLink Manager has a “run at startup” option, or you can drag and drop the DisplayLink Manager into your Users and Groups login items.
Please note that MacBook M1/M2 can work in clamshell mode (that is, with the lid closed) with Displaylink monitors connected, but Intel-based MacBooks cannot, and the displays turn off when the laptop lid is closed while using DisplayLink. It doesn’t really matter, as Intel MacBooks can run two displays without DisplayLink, although they will need DisplayLink to add three or more monitors.
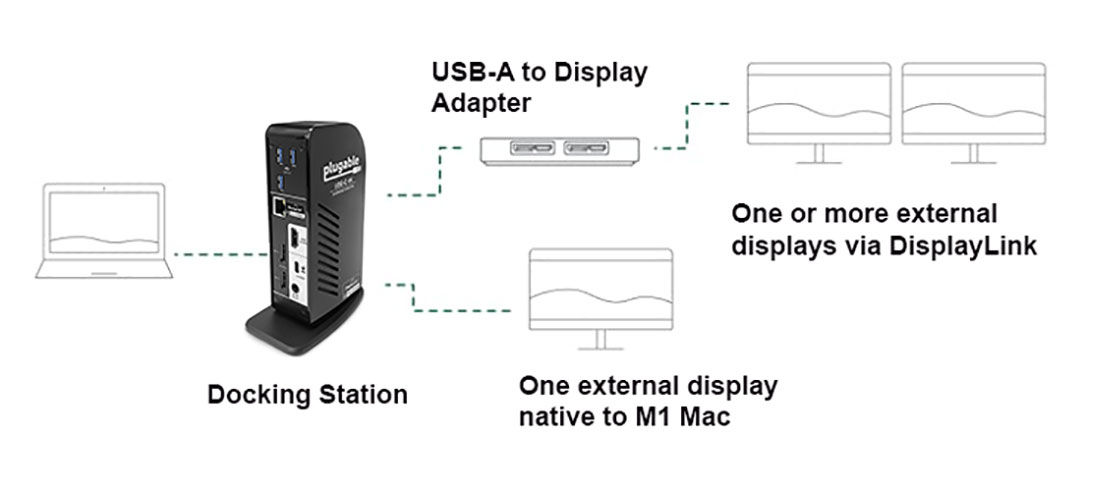
2. Then connect your MacBook to a docking station such as the Plugable UD-ULTC4K Triple Display 4K Dock or the Caldigit TS3 Plus Dock. Check out the best Thunderbolt 3 docking stations to find out more, or you can connect via a simpler USB-C hub.
3. For the first screen, you can connect via the DisplayPort or the dock’s HDMI port and this will be handled natively by the MacBook M1/M2.
You can also connect your first external display via a Thunderbolt 3 or USB-C to HDMI or DisplayPort adapter.
The HDMI or DisplayPort output uses Alternate Mode (Alt Mode) and since it’s basically a pipeline directly to the system’s own GPU, it will behave just like if you plugged a USB-C to HDMI dongle into your laptop. It does not require the installation of a custom driver.
four. The MacBook M1 cannot natively handle secondary displays.
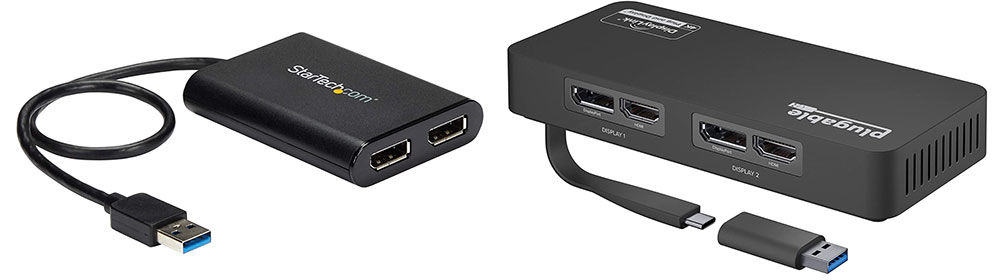
You need to connect a second or third display to one or more USB-A ports on the docking station or hub using an adapter such as the StarTech.com USB 3.0 to HDMI/DVI Adapter. It costs £80 or $80 so should be considered when evaluating your purchase of a MacBook M1/M2 if you require multiple monitors.
Another option is Plugable’s Dual USB 4K Display Adapter.
This adapter turns an available USB-A 3.0 port into one DVI-I or VGA port (DVI-VGA adapter included) and one HDMI output. Each display can simultaneously support a maximum resolution of 2048×1152 at 60Hz.
Be sure to use an active HDMI DisplayLink adapter that can support 4K at 60Hz as some are limited to 4K at 30Hz.
DisplayLink uses the installed driver and the system CPU and GPU to convert graphics data in the system into USB data packets. This USB data is then transferred over the USB cable as data packets, converted back to video information, and output to monitors via the DisplayLink chip in the docking station.

Workaround #2: Use a Dedicated Dual HDMI Adapter
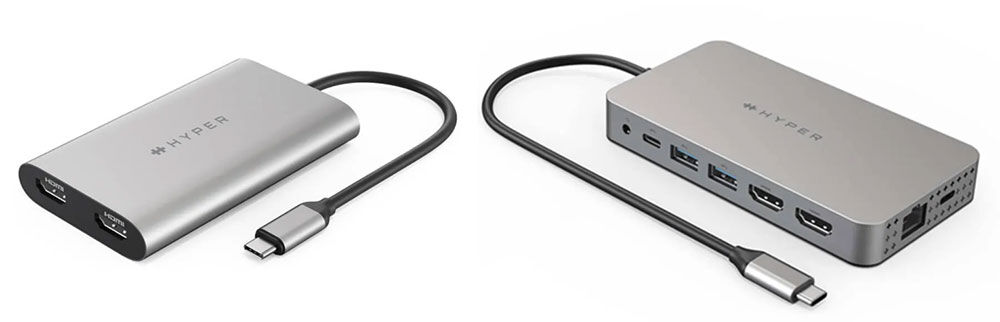
Accessory maker Hyper sells two hardware solutions that allow you to add more than one display to your Mac M1 or M2.
Hyperdrive Dual 4K HDMI Adapter for MacBook M1 as well as Hyperdrive Dual 4K HDMI 10-in-1 USB-C Hub expandable to two HDMI displays: one at 4K 60Hz resolution via HDMI Alternate Mode and DP and one at 4K 30Hz resolution via HDMI and Silicon Motion’s InstantView technology.
Hyper says they work “without having to download cumbersome drivers” but it does require some software to be installed and you need to allow InstantView to access your privacy settings in System Preferences. You plug a hub or adapter into your MacBook M1 and find the HyperDisplay app that appears in the sidebar of the Finder folder. Double-click the macOS InstantView icon and follow the instructions in System Preferences. After that, your MacBook will automatically recognize the adapter.
The Dual 4K HDMI 3-in-1 USB-C Adapter ($129.99) features two HDMI ports and connects to your M1 Mac via the built-in USB-C cable. An additional USB-C PD port lets you charge your connected laptop up to 100W – handy as the adapter itself uses one of your laptop’s two M1 or M2 Thunderbolt ports.
A more complete solution is the Dual 4K HDMI 10-in-1 USB-C Hub ($199.99), which boasts 10 ports, including two HDMI ports and a 100W PC port seen on the cheaper adapter. as well as Gigabit Ethernet, 3.5mm audio output. Combo jack, SD and MicroSD UHS-I card readers, and two USB-A (5Gb/s) ports. It also connects to a laptop via the built-in USB-C cable. Of the two, this multi-port hub is the more value-added, as you can use it as a docking station when plugged into a decent USB-C PD wall charger.
Buy directly from Hyper. Shipping to the UK is currently $66 so keep that in mind if you’re not in the US.
DisplayLink route is effective but not supported
Please note that neither Plugable nor Caldigit officially supports this kind of DisplayLink setup for Macs. The solution works, but they warn that it may not work on future versions of macOS.
Whenever a new OS update comes out, you may need to update your drivers every time.
Plugable does not recommend a workaround for gaming, video editing, digital audio workstations (DAWs), and protected content (HDCP) playback. For these workloads, users will need the full bandwidth of a bare native connection to the GPU, such as provided by a DisplayPort or HDMI port on a docking station using Alternate Mode.
Caldigit strongly recommends against using DisplayLink as it considers it unreliable and there will be no synergy between driver and docking station. Because it requires a third-party driver, users are dependent on Apple and the third-party developer to support later versions.
However, this combination of display technologies allows the MacBook M1 and M2 to work with more than one external monitor, and the M1 Mac mini with more than two.
The only risk is that it may stop working at any time, although in this case it will not harm your system and you can simply uninstall DisplayLink.
So this is a potentially limited time workaround, but chances are that compatibility will be restored at some point if the worst happens and you get your multi-monitor setup back.
The Hyperdrive hardware solution with two 4K HDMIs appears to be the more expensive but stable workaround of the two.
Read our M1 MacBook Air review.
If you want to use a second display with your Mac and not turn on your Mac’s screen, read our How To Turn Off Your Mac Screen article.
[ad_2]
Source link