
[ad_1]
There are times when your Wi-Fi network simply can’t provide the required internet connection. Maybe you’re at work and your office Wi-Fi just can’t handle all the iPad and iPhone access, so your browsing slows down to a bare minimum (or your boss decides to change your password for the same reason).
Perhaps you are in a hotel and cannot connect all your devices to the Wi-Fi in your room at the same time. Or perhaps you want to let someone connect to your Wi-Fi, but don’t want to share your password.
Or perhaps it’s the end of the month and you’re running out of data. You don’t have to stop surfing! It’s easy to create a hotspot from your Mac and share your connection with other devices via Wi-Fi, and here we’ll show you how.
Before we do that, the macOS Ventura update made some changes to how this works, so we’ll show both methods below. Skip to the next section if you are not using Ventura.
How to Share Wi-Fi from Mac to iPhone (in macOS Ventura)
Required materials: You will need an Ethernet connection to your Mac, in other words, your Mac must be connected to the network with a wire, not Wi-Fi.
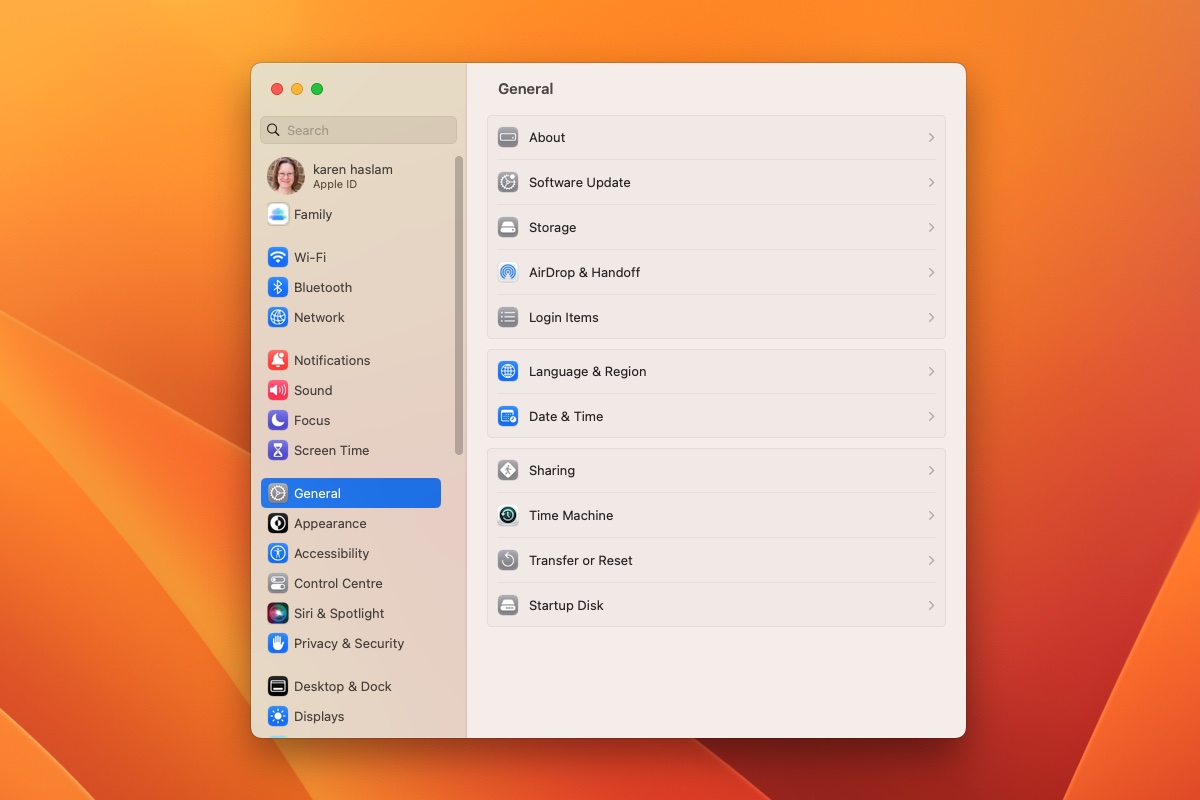
Go to System Preferences > General > Sharing.
Foundry
If you’re wondering where the sharing options have gone now that System Preferences has been replaced by System Preferences, you’ll find them in the General section.
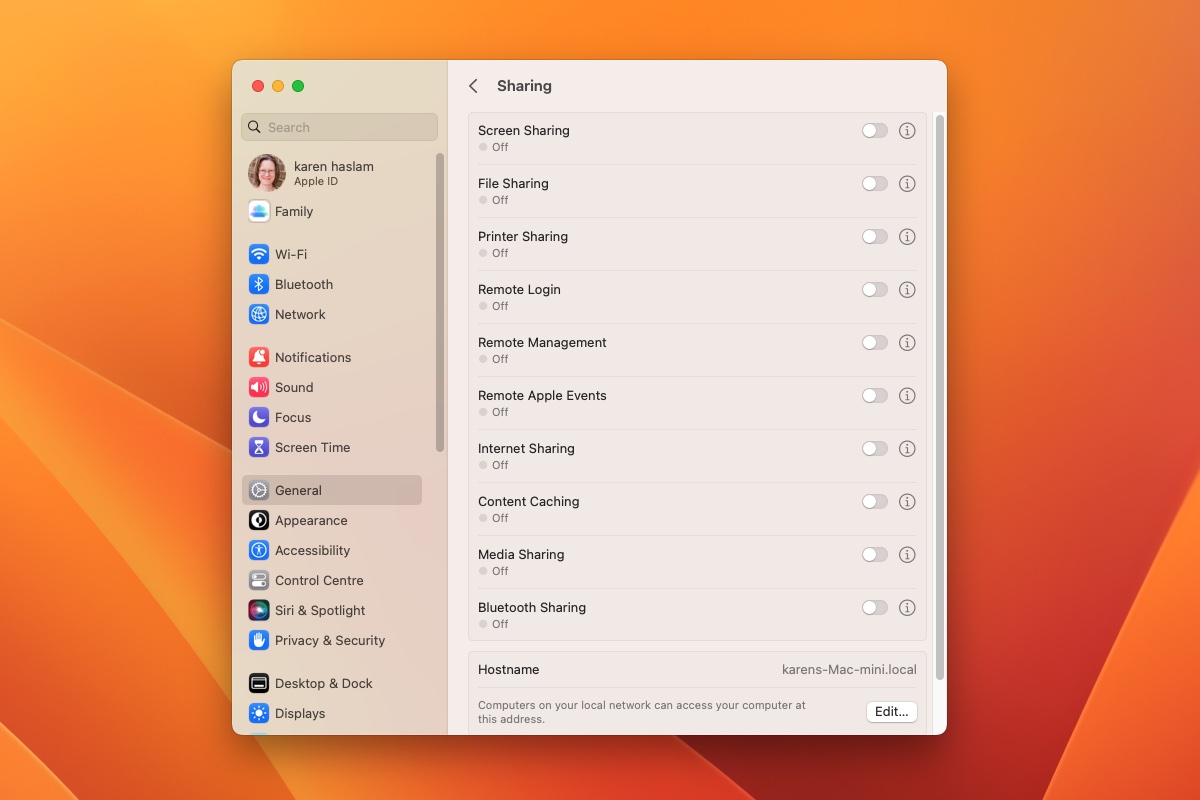
Click the i icon next to Internet Sharing.
Foundry
Click “Sharing” and then click “i” to the right of “Internet Sharing”. Don’t skip this step and go straight to turning on Internet Sharing.
Authenticate with Touch ID, watch, or passcode when prompted.
Share your connection with an ethernet adapter
Foundry
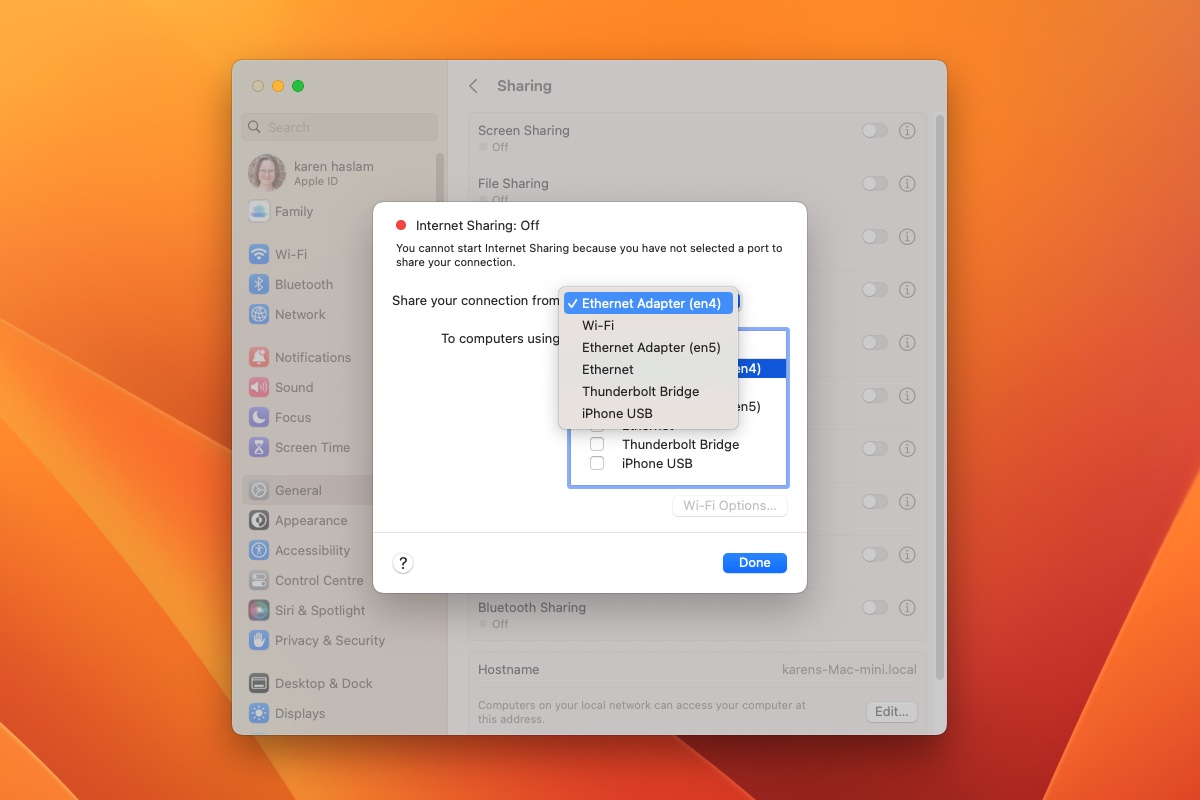
From the Share Connection From pop-up menu, select your Ethernet adapter.
Share to computer using Wi-Fi

Foundry
In the To computers using list, select the Wi-Fi field. The word “computers” here includes devices such as the iPhone and iPad.
Select Wi-Fi Options
Foundry
The Wi-Fi Settings button at the bottom of the dialog box will now be clickable.
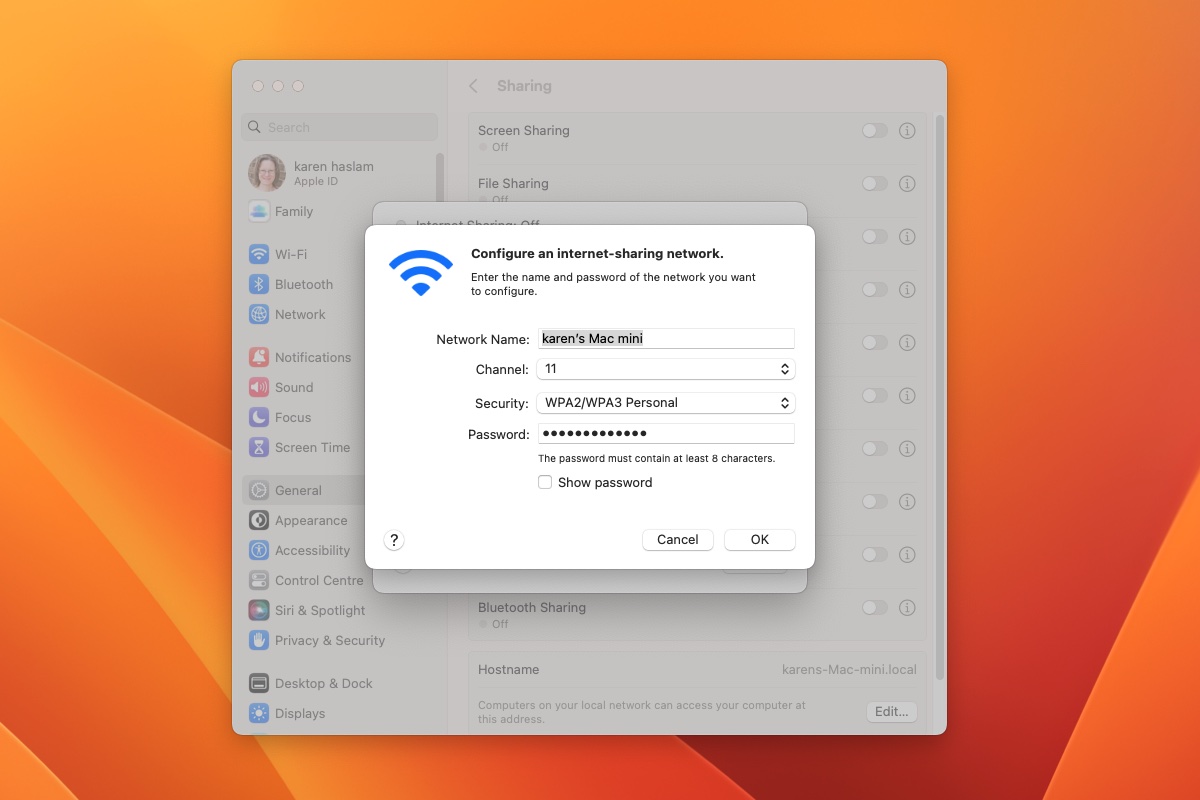
Tap Wi-Fi Settings, then enter a name, select a channel, and set Security and a password.
In the Channel section, select the high numbered channel (36, 40, 44, or 48) as this will give you more range than the low numbered channels (1, 6, 11). Higher numbered channels use the 5GHz band, which will be compatible with any mainstream electronics, including all Apple hardware sold in the last few years. However, if you have older gadgets that can only use 2.4GHz connections, you’ll have to stick with 1, 6, or 11.
In the Security section, you have the choice of WPA2/WPA3 Personal or WPA3 Personal. You should probably choose WPA2/WPA3 as it provides better compatibility. In terms of security, WPA3 is not significantly different from WPA2. We give more tips here.
Click OK and click Finish.
Turn on Internet Sharing
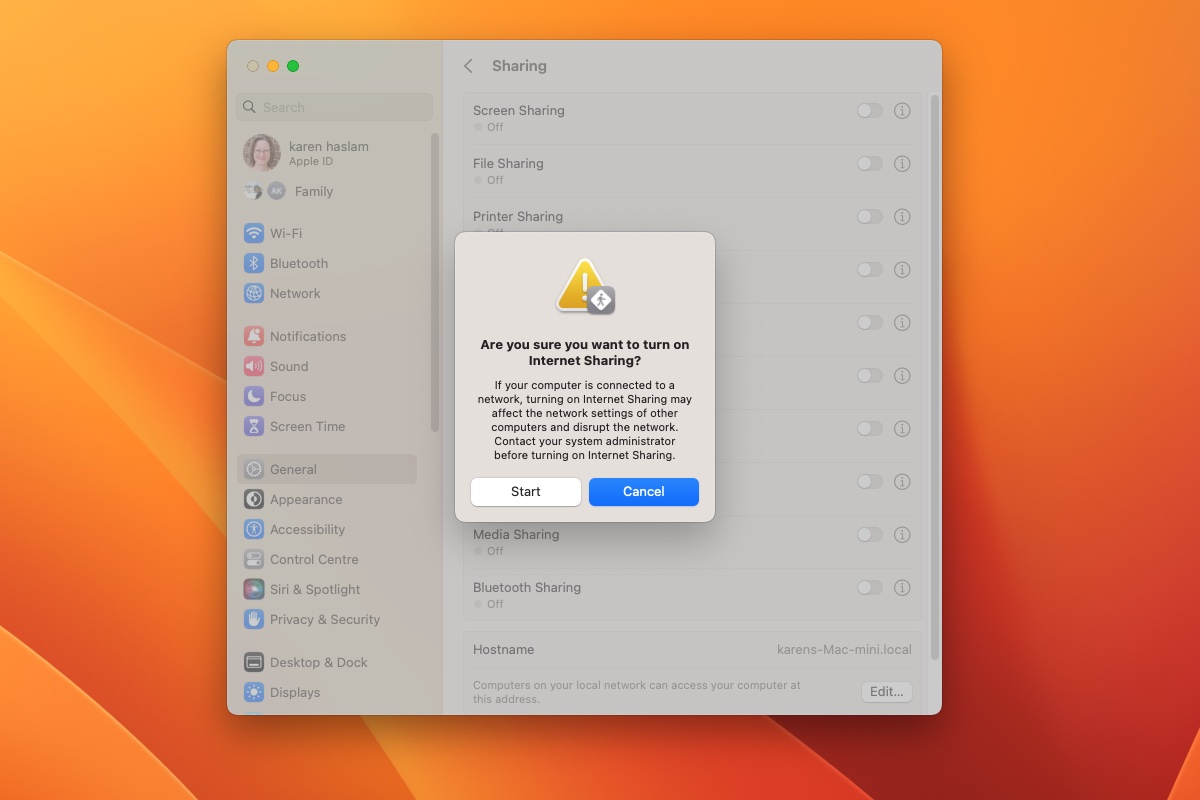
Foundry
You can now click the switch next to “Internet Sharing” to enable sharing this connection. You will see a warning. If you’re ready to continue, click Start.
How to share Wi-Fi from Mac to iPhone (pre-macOS Ventura)
If you haven’t installed Ventura yet, or if your Mac isn’t compatible with the 2022 version of macOS, follow these steps.
- Open System Preferences and select Sharing. If you don’t see the screen below, click the 12 dots icon.

- Click Sharing.
- Now click on the box next to Internet Sharing.
- Next to “Share your connection from:” select “Ethernet”.
- Below, next to “To computers using:” select Wi-Fi.
- Then click Wi-Fi Settings, this will give you the option to choose a password to prevent strangers from connecting to your Wi-Fi (it must be at least eight characters long). Next to Security, select WPA2 Personal, then enter your password and confirm it. (WPA2 is the 802.11i encryption standard.)

- Now click on the box next to Internet Sharing.
- Confirm that you want to enable Internet Sharing by clicking Start.

- You have now created a Wi-Fi hotspot on your Mac. Note that where you would normally see that you have a Wi-Fi signal, you now see an arrow icon indicating that you are sharing your connection.

How to join the hotspot you created
Now that you’ve set up a hotspot, you’ll be able to join the network created on your Mac from your other devices.
How to connect to a hotspot from an iPad or iPhone
- On your iPhone or iPad, go to Settings > Wi-Fi.
- Select the network you just created.
- Enter the password you set and you’re done.
How to connect to a hotspot from another Mac
- To add a second Mac to a Wi-Fi hotspot, click the Wi-Fi icon at the top of the screen.
- Select the name of the Wi-Fi hotspot you want to connect to.
- Now enter the password for this Wi-Fi network.
How to Create a Mac Wi-Fi Hotspot Without Ethernet
But what if you don’t have an Ethernet connection, perhaps your MacBook doesn’t have an Ethernet port, and you don’t want to purchase an adapter, let alone a wired connection?
Unfortunately, your Mac cannot share a Wi-Fi internet connection with Wi-Fi… unless you have an optional accessory.
While the Mac’s built-in network card can either connect to Wi-Fi or host its own network, users can buy a Wi-Fi network adapter that will allow one network interface to receive a Wi-Fi connection while another relays it. . You can use a USB Wi-Fi adapter like: $16.99 from Amazon or £9.99 from Amazon UK.
After connecting and installing the Wi-Fi adapter, follow the instructions above and choose one of the two Wi-Fi adapters instead of the Ethernet connection used in step 3 above.
How to Share Internet from Mac to iPhone via Bluetooth
But what if you don’t want to shell out for a Wi-Fi network adapter? There is another option, although it won’t be as fast as Wi-Fi and may not be compatible with so many devices. This is because instead of using Wi-Fi to share an internet connection with your other devices, it will use Bluetooth; or more specifically Bluetooth PAN (Personal Area Network).
The initial connection to devices will take longer due to the Bluetooth pairing process, but it’s a free alternative if you want to share your internet connection over Wi-Fi and should work with most smartphones and tablets.
The setup is the same as if you were sharing over Wi-Fi (see the steps above), but make sure you select Bluetooth PAN in the “To Computers Using” box when faced with Set up Public Internet Access Network.
To join a Bluetooth network from your iPhone, follow these steps:
- Make sure Bluetooth is enabled on your Mac.
- On your iPhone, go to Settings > Bluetooth and make sure Bluetooth is turned on.
- Now go to Settings > Cellular Data (or Mobile Data) and tap on Personal Hotspot.
- Now you need to connect your iPhone to your computer. Open the Bluetooth panel in System Preferences and scroll down until you see your iPhone, then click Connect.
- The code will appear on both of your devices, click “Pair” on your iPhone to pair both devices. Click “Pair” and enter the code shown on your computer.
- You should now see a blue Bluetooth icon in the top left corner of your iPhone screen indicating that the devices are connected.
- On your Mac, the regular symbol showing Wi-Fi will show an arrow.
- On your iPhone, go to Wi-Fi and find the Mac you want to connect to.
- On your iPhone, you will see an option to join a Personal Hotspot, click “Join”.
- Enter a password if you have set one.
We also have an article that explains how to share your iPhone’s data connection with your Mac so you can get online. And if you’re looking for ways to expand your Wi-Fi network or avoid dropouts, read: How to Increase WiFi Connection Speed on Mac.