[ad_1]
A photo you wish to upload or print for any purpose may be considered too “low resolution” to meet the needs of a website, print, or online photo service. What are your options? You can change the image resolution to fix the problem.
There are two aspects of a digital image that are often referred to as “resolution”:
- dimensions pixel images, such as 3024 by 4032 for modern iPhone photography. Each pixel represents the captured information, a sample of the hue and intensity of the light that has passed through the lens onto the sensor element of the camera.
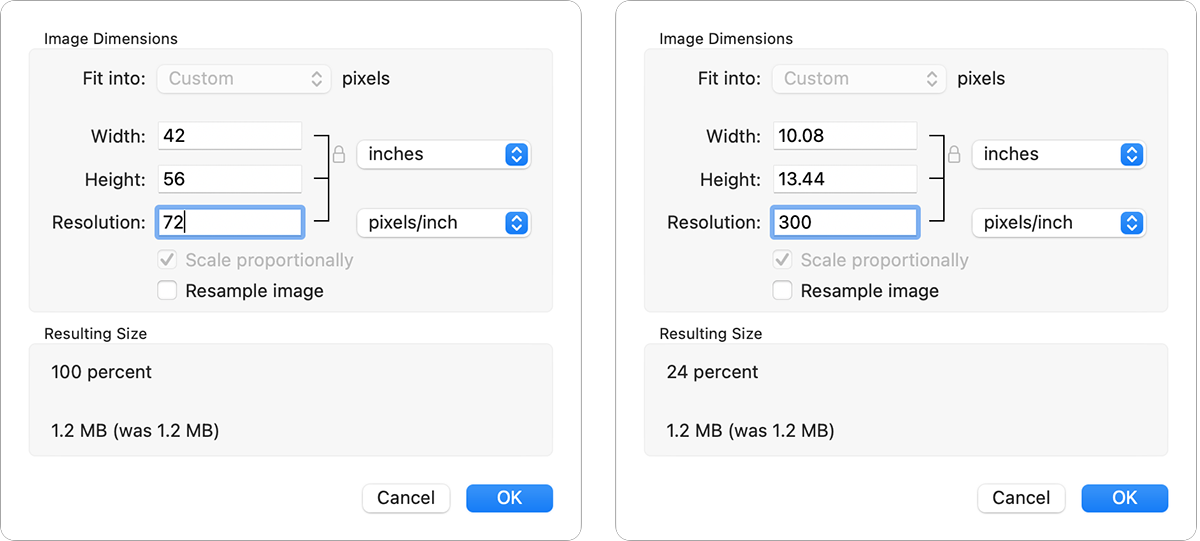
- pixel density, or the number of dots or pixels per inch (dpi, ppi) that maps pixels to a preferred screen size. (Of course, you can also map by centimeter.) Most images are recorded at 72 ppi, which makes the iPhone image at the above dimensions 42 by 56 inches (107 by 142 cm) when printed or displayed at 72 ppi.
In many cases, the image contains just the right amount of information and you don’t need to modify it. Instead, you need to change the scale so that it appears as the website, printer driver, or service accepts it. For example, printer software may recommend 300 ppi from an input image to produce 6-color or 8-color inkjet prints at 1200 dpi. (Because screen pixels represent millions or even billions of colors, and printer dots can only reproduce a few colors—just black plus cyan, magenta, and yellow on an inexpensive inkjet printer—a higher printer dot density is required to simulate the original color)
You can change the density in the built-in Preview app on macOS:
- Start preview.
- Open your image.
- To choose File > Duplicate or hold Option and select File > Save As work with a copy of the image.
- To choose Tools > Resize.
- Uncheck “Resample Image” which changes the file data.
- Enter a new resolution value, such as 300 ppi.
- By selecting inches (or cm or mm) for the pop-up menu in the Width and Height section, you can preview the resized units after entering a new resolution value. Click OK.
- Save the image.
If you need more image data than is contained in the file, usually because you’ve cropped the image, you can resize it in Preview. Results will often look blurry at 100% zoom because the preview cannot add new information where there is none. It can only fill new pixels, which average neighboring ones.
To zoom in, follow steps 1 to 4 above and then:
- Make sure the Resample image checkbox is checked.
- Either enter a new size in units (inches, cm or mm) or a new width or height in pixels. (When “Scale Proportionately” is checked, the preview automatically resizes another dimension proportionally to the aspect ratio of the image, saving you the trouble of calculating it.)
- Click GOOD.
- Save the image.
In step 2 above, you can change both the resolution and unit size if you know the output size and required resolution. For example, change Resolution to 300 and Width to 12 inches for a 12-inch wide print, and the preview will calculate that it needs to zoom in by 119 percent.
High quality photo editing software includes more sophisticated scaling procedures. Adobe Photoshop offers several through a pop-up menu that allows you to select and preview based on the type of image you’re resizing. You can select one algorithm for capturing a screen or a high contrast image, and another for capturing outdoors in good light.
You can also turn to software that includes machine learning AI upscaling that can intelligently smooth out patterns in images and fill them in to make them look more realistic. You can’t add information from a void, but algorithms can remove hard edges and pixelation, smoothing out tones, especially on faces.
AI options include features found in newer versions of Adobe Lightroom (Enhance) and Photoshop (Neural Filters); both apps are part of an Adobe Creative Cloud subscription. You can also use standalone Photoshop apps or plugins such as ON1 Resize AI ($79.99) and Topaz Gigapixel AI ($99.99).
This Mac 911 article is in response to a question posed by Macworld reader Linda.
Ask Mac 911
We’ve compiled a list of the questions we get asked most frequently, along with answers and column links: read our super FAQ to see if your question is covered. If not, we are always looking for new problems to solve! Send your email to mac911@macworld.com, including appropriate screenshots and indicating if you would like your full name to be used. Not every question will be answered, we do not respond to emails, and cannot provide direct troubleshooting advice.